Showing posts with label slice. Show all posts

Sunday, 25 August 2013

Wagon Wheel Slice


WAGON WHEEL SLICE

The Wagon Wheel Slice had been on my list of things to make for a while but I'd never gotten around to making it. After trying it at my recent Madonna birthday party, I wish I'd done it earlier. It was certainly the favourite for the night with my guests. The wonderful thing is that it does have that taste of the old fashioned Wagon Wheel, but in a delicious slice. There weren't many of them left after the party, but the ones which were I took into work the next day and they disappeared very fast as well. One of my friends who has tasted a lot of my baking said they were one of the best I'd made. Thanks Cas!

I think I held off making them because I thought it was going to be delicate and difficult to make. I'm a pretty robust baker, and have never been described as delicate. But the thing is, when I made these, they were much simpler than I thought. Not at all hard, and parents, you could certainly make these with the kids. Think this could become quite the family favourite for you.

One more biscuit for you guys during the week and then I may go back and blog some of my older recipe attempts. Trying to be good over the next few weeks and drop a few kilos for an upcoming photo shoot I have. But don't worry, baking will never be too far away from me. I'll just have to do a few more push ups to make up for it!


INGREDIENTS:

235g Unsalted Butter, softened
1/3 cup Caster Sugar
1&1/2 cups Plain Flour
1/3 cup Self Raising Flour
1/2 cup Raspberry Jam (I only had Strawberry and still came out well)
145g Marshmallows, white preferred but doesn't really matter - I had to use some pink too
200g Dark Chocolate Melts


DIRECTIONS:

1 - Preheat oven to 180°c and grease and line a slice pan.

2 - Using electric mixer, beat 185g of butter and sugar until light and fluffy. Sift flours over butter mixture. Stir with spoon until dough comes together.

3 - Press mixture into prepared pan. Level and press down with the back of your spoon. Don't over fill (I ended up not using a little of my mixture - as seen in the above picture).

4 - Bake for 20 minutes or until golden. While baking, use scissors to cut marshmallows in half.

5 - Spread warm base with jam. Cover with marshmallows, cut size down. Bake for 2 minutes. Remove from oven. Press down on marshmallows to level surface. Cool completely in tin.

6 - Combine chocolate and remaining butter in a small saucepan over low heat (I used a double boiler saucepan). Cook until completely melted and smooth, don't rush this process. Pour over marshmallows and smooth the top. Refrigerate until set.

7 - Cut in pieces to serve and enjoy.

Catch you during the week with the lemon and lime shortbread in one of the pictures.

Wayne
xx


Sunday, 28 July 2013

Homemade Snickers Bar


HOMEMADE SNICKERS BAR

Last year my boyfriend sent me a recipe, a homemade Snickers bar, that he wanted me to try and make for him. It looked tricky, but I am someone who loves a challenge. So I decided to make these little wonders. They took some effort, but it was worth it as they are divine. D-VINE! I made them the first time and then waited for well over a year to try again, because making this the first time, I heard Whitney Houston died. Now Whitney was my first ever favourite singer. And through the years she still remained someone I loved. So the recipe was tainted slightly, I remember making it while playing Whitney loud and bawling my eyes out.

I made it again for my birthday this year, no one died, and everyone loved it. So I won't hold it against this recipe anymore.This recipe makes a large amount, and because it's so rich you only need to cut small pieces. So I cut it all up for my birthday party and assumed there would be some left over for my Mum to take back to Sydney. I wish I had put some aside, because it all went - very fast! I only got one piece, but it was okay, it made me feel like I'd done a good job. I then also made two trays for my friend Corey's short film and people raved about the slice. I have included the photo of the uncut tray with the other baked goods I made. All tasty!


So here's the recipe. I've done it differently than before. Each layer is listed with its ingredients and directions. Happy baking (even though this one is all done on the stove top.)

Now for making it, I always use a tin tray that I throw out after. I use canola spray to grease it beforehand.

BOTTOM CHOCOLATE LAYER

1 1/4 Milk Chocolate Melts
1/4 cup Smooth Peanut Butter

Melt ingredients together in a heatproof bowl above a saucepan of boiling water. Don't melt too fast, keep flame on a medium heat. Pour into the dish and spread until even. Let cool to room temperature and place in fridge until completely set.


NOUGAT LAYER

60 grams Unsalted Butter
1 cup Granulated Sugar
1/4 cup Evaporated Milk
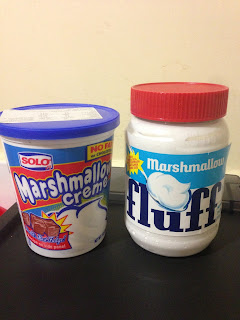
1 1/2 cups Marshmallow Fluff (included photo above - found in a US sweet store or online)
1/4 cup Smooth Peanut Butter
1 1/2 cups Salted Peanuts, roughly chopped
1 teaspoon Vanilla Extract

Melt butter in a saucepan over medium heat. Add in sugar and milk, stirring until dissolved and bring to boil. Let cook for 5 minutes, stirring occasionally. Add in fluff, peanut butter and vanilla - stirring until smooth. Turn off heat and fold in peanuts, then pour over bottom chocolate layer and spread until it covers it completely. Let cool to room temperature and then cool in fridge until completely set.


CARAMEL LAYER

1 can of Top 'n' Fill Caramel (photo below)
1/4 cup Double Cream

Combine ingredients in a saucepan over low heat. Stir occasionally until smooth and fully combined. Pour over nougat layer and let cool completely. Put in fridge and make sure it is completely set.


TOP CHOCOLATE LAYER

1 1/4 cups Milk Chocolate Bits
1/4 cup Smooth Peanut Butter

Melt ingredients together in a heatproof bowl above a saucepan of boiling water. Don't melt too fast, keep flame on a medium heat. Pour into the dish and spread until even. Let cool to room temperature and place in fridge until completely set.

Cut to size you want and keep in fridge when not eating. Share these round and EVERYONE will love you (or hate you - depending on whether they are on a diet). 

Can't wait till I make these again. If you make them, please send a pic - love to see how they turn out.

Wayne
xx


Friday, 26 July 2013

Oat, Sultana and Choc Chip Slice


OAT, SULTANA & CHOC CHIP SLICE

Confession time: I am truly in love with baking right now, as you've probably guessed. I'm loving writing my blog and I also love when friends are coming over as I'm able to try new recipes. My good friend Cas was coming over recently for a coffee, a chat and some baked goodness. I looked what was in the cupboards and found a recipe to make from the ingredients. Now these were nice, I always love oats in baking and as for chocolate, that goes without saying. Cas enjoyed these, we had a great chat and then I took the leftovers to drama class for my teens to try. They were gone within a few minutes, so they must have been okay!

The thing I love about the above photo, it shows some of the great homewares I got for my birthday. Homewares, my other little obsession right now. Someone make me this guy a 1950's housewife!

Spent the last two days baking extravagant birthday cakes for the two birthday parties I am going to this week, so can't wait to share those with you next week. Until then, keep baking.


Recipe originally from:

INGREDIENTS:

125g Unsalted Butter
1 tablespoon of Golden Syrup
1 cup of Self Raising Flour
1 cup of Desiccated Coconut
1/2 cup of Caster Sugar
1 cup of Rolled Oats
3/4 cup of Sultanas
2/3 cup of Choc Chips (milk or dark)
1 large Egg

DIRECTIONS:

1 - Preheat oven to 180°c and grease and line a slice pan.

2 - Put butter and golden syrup in a small saucepan over low heat, stirring occasionally. Remove from heat when butter has melted. Allow it to cool to lukewarm before mixing it with other ingredients.

3 - In a large bowl, mix flour, coconut, sugar, oats, sultanas and choc chips with a wooden spoon.

4 - In a small bowl, lightly beat egg with a fork. Add to the large bowl.

5 - Add the slightly cooled butter mixture to dry ingredients and stir until well combined.

6 - Press firmly into the slice tray. Using the back of a spoon to push it all down.

7 - Bake for around 20 minutes, or until golden.

8 - Allow slice to cool to room temperature in pan. Cut in pieces to serve.

9 - Best with fresh coffee or tea. Enjoy.

Have a great weekend and do some baking, your friends and family will thank you! 

Wayne
xx